Site-Directed Mutagenesis by PCR Overlap and Fast Mutagenesis Techniques
PCR Success Story #16Project Description
Site-Directed Mutagenesis by PCR Overlap and Fast Mutagenesis (paid service)
Our work consisted in performing Custom Fast Mutagenesis :
- design of site-directed mutagenesis strategy
- performing site-directed mutagenesis by 2 different methods : PCR overlap and Fast Mutagenesis (whole vector amplification).
To perform the cloning experiments, we have used TransBionovo (formerly known as Transgen Biotech) and Favorgen products:
- TransStart FastPfu (High-Fidelity) DNA Polymerase,
- FlyCut Nde I,
- FlyCut Nhe I,
- FavorPrep GEL/PCR Purification Kit
- T4 DNA Ligase
- Trans1-T1 Phage Resistant Chemically Competent Cell (fast-growth).
- EasyPure Plasmid Miniprep Kit
To protect the research and privacy of the customer who paid for our Expression Vector Preparation Service, the name of the gene gene and researcher are held confidential.
Project Details
Client: University of Ottawa
Date: August 8th, 2016
Type of experiment: 2 base (1 codon) modification by site-directed mutagenesis (2 strategies)
DNA Polymerase: TransStart FastPfu High-Fidelity DNA Polymerase
Strategy #1: Mutagenesis by PCR Overlap Extension
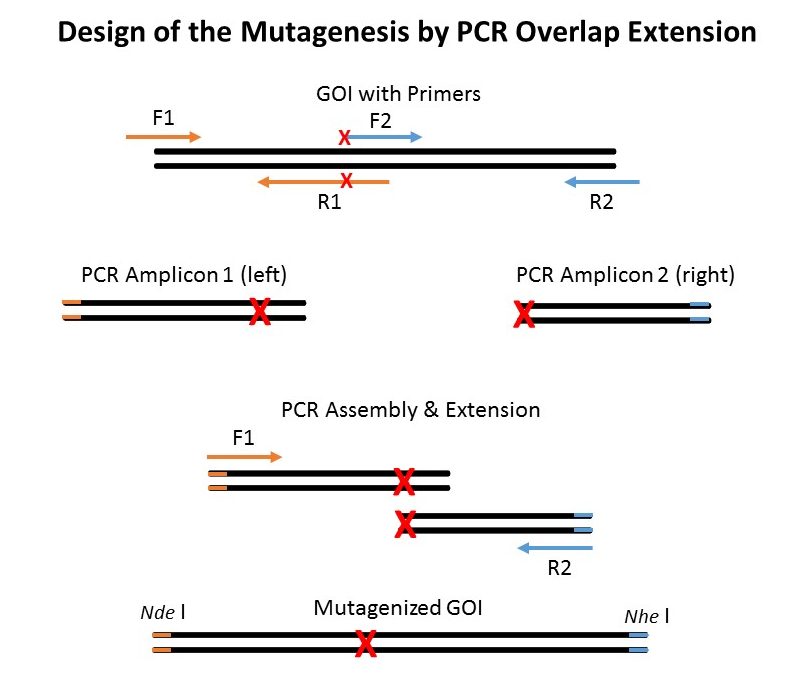
Principle of Mutagenesis by PCR Assembly & Extension
The ‘old-school’ way of performing site-directed mutagenesis is depicted above. The PCR overlap and extension strategy may seem to present many steps but it has one major advantage as compared to whole vector amplification (Quickchange mutagenesis or Fast Mutagensesis System in strategy #2). As you don’t amplify the entire vector and risk introducing unwanted mutations, the PCR overlap extension strategy doesn’t require subcloning of the final mutated Gene of interest (GOI) into a new vector (that did not go into a PCR amplification step).
Steps:
- Perform High-Fidelity PCR with FastPfu, FastPfu FLY or KD Plus from primer F1 (containing Nde I site) to R1 and F2 to R2 (with Nhe I site) - Nde I and Nhe I are unique cutting sites in the template vector. You get a LEFT and a RIGHT fragment both containing the mutation.
- Gel extract or PCR purify the LEFT and RIGHT amplicons.
- Mix 1 ul of both LEFT and RIGHT purified fragments along with the external primers F1 and R2.
- Gel extract or PCR purify the GOI assembly amplicon. This is your GOI assembly containing the desired mutation.
- Digest the template vector and the GOI assembly amplicon with appropriate enzymes (Nde I and Nhe I in this case).
- PCR purify the Nde I-GOI-Nhe I and Nhe I-vector-Nde I.
- Ligate everything in a proper ratio using T4 DNA Ligase for 1h.
- Transform into suitable competent cells such as Trans1-T1 (fast-growth) Chem. Competent Cells.
- Pick colonies, do glycerol stocks and perform Plasmid Minipreps.
- Send to Sequencing, analyze and done.
Strategy #2: Mutagenesis by Fast Mutagenesis PCR (whole vector amplification)
Principle of the Fast Mutagenesis System
Steps:
- Perform High-Fidelity PCR with FastPfu, FastPfu FLY or KD Plus.
- Digest 1 h with DMT (Dpn I) enzyme.
- Transform into DMT Chem. Competent Cells or other.
- Pick colonies, do glycerol stocks and perform Plasmid Minipreps.
- Send to Sequencing, analyze and done…well, not if you don’t want to take any risk.
- (optional but safer) Digest the empty vector (that didn’t go into a PCR reaction) and the new mutant GOI in your plasmid obtained in (4) with appropriate enzymes (Nde I and Nhe I in this case).
- (optional but safer) Gel extract both the original vector and the band containing your mutant GOI.
- (optional but safer) Ligate everything in a proper ratio using T4 DNA Ligase for 1h.
- (optional but safer) Transform into suitable competent cells such as Trans1-T1 (fast-growth) Chem. Competent Cells.
- (optional but safer) Pick colonies, make glycerol stocks and perform Plasmid Minipreps.
- (optional but safer) Send to Sequencing, analyze and NOW you’re really done!
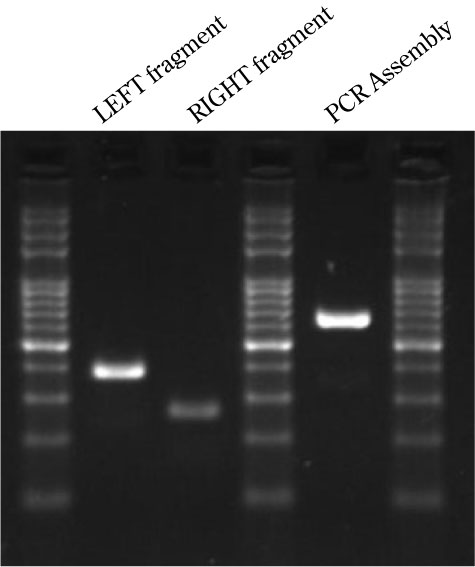
Results of the PCR assembly
LEFT : amplicon from F1 to R1
RIGHT: amplicon from F2 to R2
ASSEMBLY: LEFT+RIGHT and F1 and R2 primers.
Sequencing
Plasmid minipreps both from Strategy 1 and 2 were sent out for sequencing at La Plateforme de Séquençage du CHUL in Quebec City and then sent out to the researcher with all maps, sequences, minipreps and glycerol stocks.
-
DMT Competent Cell (DpnI+) - CD511
$136.00 – $212.00 CAD -
DMT Enzyme ( Dpn I ) - GD111
$72.00 CAD -
Fast MultiSite Mutagenesis System - FM201
$600.00 CAD -
Fast Mutagenesis System - FM111
$240.00 – $415.00 CAD -
Ju™ DNA Assembly Mix for Cloning and Mutagenesis - CB-JU101
$125.00 – $280.00 CAD - Sale!
KLD Mix for Back-to-Back Site-Directed Mutagenesis
$110.00 – $464.00 CAD


